I have seen a lot of websites giving advice to cyclists, from bike fit, to technique, however none seems to apply specifically to people who are obese.
Being obese brings its own problems, from bike fit, comfort, to even just being able to get started and help your partner getting into cycling.
I have been both really obese, and slim, and cycled. I have helped a few people into cycling, and also seen some people put right off by over-enthusiastic friends trying to get people into it. Hence the reason for this post, just in case you are larger and need advice, or are helping somebody larger.
Getting the Bike & Bike Fit
When starting out, most people need comfort. If it’s a painful, or uncomfortable experience, they will not want to repeat it!
The bike fit is NOT the same as a normal person! You will need a stronger frame than usual, I would suggest alloy (lighter), or if you are particularly heavy, Steel. Don’t waste money on cheap bikes, get a good brand name bike, even if its second hand. Cheap bikes fall apart, often are not comfortable. Carbon is probably not ideal for heavy weights, its flexible and will crack.
A hybrid is a good option as it has a more upright way to sit, larger tyres, and better seats. Make sure you have 3 cogs on the front, you will need these for any sort of hill (be it mild or otherwise), and it will help stop you getting sore knees from hauling the extra weight.
Road Race bikes are not great for first timers, the fit is fairly aggressive which can put far too much weight on your arms (stomach pulling you forward), and not allowing you to breath when pedalling due to knees hitting belly.
Make sure the seat is as high as you can handle, as this keeps knees from hitting belly as much as possible, also helps with pedalling. Make sure you explain this to the person riding as it will feel weird at first, if they understand the why they will tolerate it much better.
Handlebars need to be higher than seat if you can, feel free to buy an Adjustable Stem so you can raise them higher to begin with, taking weight off the arms.
Make sure the seat is a larger (but not stupidly large) seat, preferably with Gel. Whilst thinner smaller seats are our goal, when you are larger this can cause back pain due to any road bumps travelling up the spine with the extra weight involved. Having a more padded seat allows not just the sit bones, but the rest of the buttocks to spread the weight over a larger surface. This means no one point is going to get sore, though it may cause chafing. If you can find a larger seat with good sized cut out, this should solve the problem. Mountain bike seats are good for this.
Starting out
When starting out, its good to find a good flat long ride, aim for 5-10km and what ever pace they prefer. Make sure the lower gears are used at all times, and spinning with very little weight is encouraged. It’s everyones tendency to grind a bit when beginning, using harder gears, but when a larger person does this it can very quickly end up hurting knees and other joints.
Spinning is a good habit, and it places the work on the cardiovascular system rather than the leg muscles. This allows them to get fitter faster, and enjoy the ride with less pain.
Make sure you accompany them on all rides, talk to them about anything and everything under the sun to distract them from what they are doing. Don’t push them into doing anything fancy, just let them get a few easy rides under their belt at their own pace.
If a person finds riding painful, hard, or boring, they are not going to do it again.
Avoid hills until they are ready to go on them, its extremely hard to do hills when larger, this is where those lower gears will be needed. Most newbies are also fairly scared of having to start riding on a hill, or going down hills fast. Make sure the hills are barely there to start with, and you give them options for if they need to bail.
The last thing you want is them to feel like a failure!
Make sure you have good gaps between cycling days at first, until their body has adapted and is not sore. Nothing is worse than going cycling 2 days in a row when you have chafing or soreness somewhere. By wearing cycling smart watches they can check the number of kilometers they have cycled, and this intern boosts the self-confidence and makes them feel better.
Moving on
Encourage them to have a local loop they can do by themselves, and then do larger rides with them. Put the bike computer in your back pocket to avoid clock watching, see their face when they are pleasantly surprised by how far they went.
Look into getting some Bone Conduction headphones, they can be used when cycling since they do not block your ears (I found aftershokz brand for $30-40 on amazon.com). This enables a person to ride solo and listen to music whilst cycling alone, with less chance of boredom.
Enter some races which are achievable, work out a plan to train for it, and allow for weeks when a bike may break, person maybe over tired or other problems.
Remember, you may have spokes break. Extra weight on a bike will eventually break spokes, its worth getting a professional to replace them and true up the wheel as soon as this happens. If the wheel is not fixed correctly, the weight is not distributed over the entire wheel and other spokes will break costing you more in the long run. Be aware to check for broken spokes every ride or two, not noticing them will result in an egg shaped wheel that may need replacing!
Hydration
Buy a backpack, camelbak or similar with water. Its easier to hydrate when learning, and carries a lot more water than a bottle. Larger people will need a lot more water to begin with, and the weight difference isn’t going to be noticeable. Pays to get one with bumps on the back so air can flow between the bag and your back if you can, but not necessary.
Clothing
Cycle shorts with padding are a must, and its worth splurging on decent ones (though not necessarily expensive ones). Make sure you let them know its fine for them to wear baggy shorts or 3/4 pants over top of the shorts – most larger people are very aware they have a super sized rear which probably looks less than desirable in lycra 🙂
For the top half, a T-shirt may be more comfortable and look more flattering. Back pockets are not essential, get a bike bag for anything you need to carry. Most newbies are not adept at getting things from pockets when cycling anyway (especially when wearing a water pack on their back).
Bike Computers
Get a cheap one with cadence, since cadence is more important at this stage than anything much else. Otherwise go without, and have them keep their pedalling timed with your own. I have had a friend sit behind me and just make sure shes pedalling the same speed as me, and adjusting her gears to match which worked well, this also helped her stop clock watching.
The Bottom Line
Make the experience as pleasant as possible, even if it means gritting your teeth to not say something. The better the experience, the more likely they are to stick with it and get better. Compliment them on anything and everything they do well. Don’t force them into doing things they do not feel comfortable (hills, busy roads, groups) until they are ready for it, and give them an opt-out solution in case they change their mind last minute (eg short cuts around hills)
Show them the wonder of cycling, how amazing it feels, and how great you feel when cycling!
The fix is simple, just download the zip file, and run the installer which copies the libraries over. I have libhashab_mod_14-04-13.tar.gz mirrored so you don’t need a login on the ubuntu site.
wget http://lizquilty.com/wp-content/uploads/2013/09/libhashab_mod_14-04-13.tar.gz

tar zvxf libhashab_mod_14-04-13.tar.gz

sudo ./install_64bit.sh # or sudo ./install_32bit.sh if you are 32bit
Then you just need to open your favourite media application, I found it worked nicely with Banshee, but clementine still had an error (possibly cached or other).
I have played with a bit of Arduino, however decided that i wanted to move more into robotics. This entailed learning about motors, servos, and other bits and pieces. I figured a good way to learn the basics was to purchase a kit, and i wanted it to be a semi decent kit, not just a cheap crappy one that i could not extend later on.
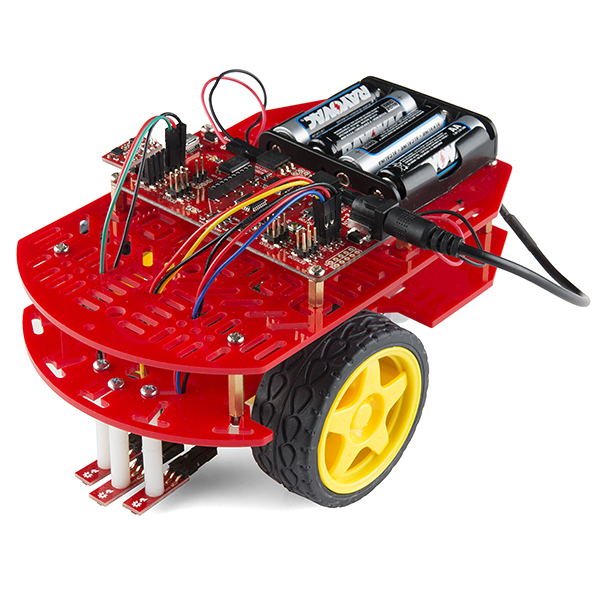
For this reason, i ended up deciding on the RedBot Kit, which had a nice Arduino board with built in motor shield, and things seemed well labeled. It was the nice combination of not to crappy, with not too over priced.
1. Magician Chassis
The kit contains the Magician Chassis which is a good basic chassis that comes with 2 geared motors, good mounting areas, and battery pack. Assembling the Magician Chassi is fairly straight forward, and the instructions are fairly clear if you can view images ( Here are the instructions ). Hint: Ignore the instructions to mount batteries between the layers, its difficult to change them if you do, put them on the top if you can fit them 🙂
I did struggle with getting the motors to fit in the gap and the bolt through the holes to all line up, i found the easiest way was to do the top (or bottom if its up the right way) bolt through with the side clips out, then squish those in and put the bottom bolt in. Careful doing so, the plastic is brittle and may break. It may even pay to sand it down if its too tight (though beware, you don’t want it to be loose!), or use another method to attach the motors.
2. RedBot Board & Sensor Assembly
When it came to adding on the board itself, there were no guides at all, you just had to somehow magically figure it out via trial and error, and a bit of know how. Knowing the basics of Arduino was what got me through, but i thought it best to document it here for anyone else looking. First of all, read the quick start guide, it has a lot of the information at https://learn.sparkfun.com/tutorials/getting-started-with-the-redbot
Start by mountomg the board on the chassis, the following image will help a lot with where and how to fit it.
This image is also good to see how the line sensors are mounted on the chassis. When you mount the line sensors make sure the small black dot at the end is facing down, as this is the sensor part, and the pins face the back. Feed the 3 cables from each line sensor up through the body, making sure to stay away from moving parts (wheels etc), and not have them hanging out too much.
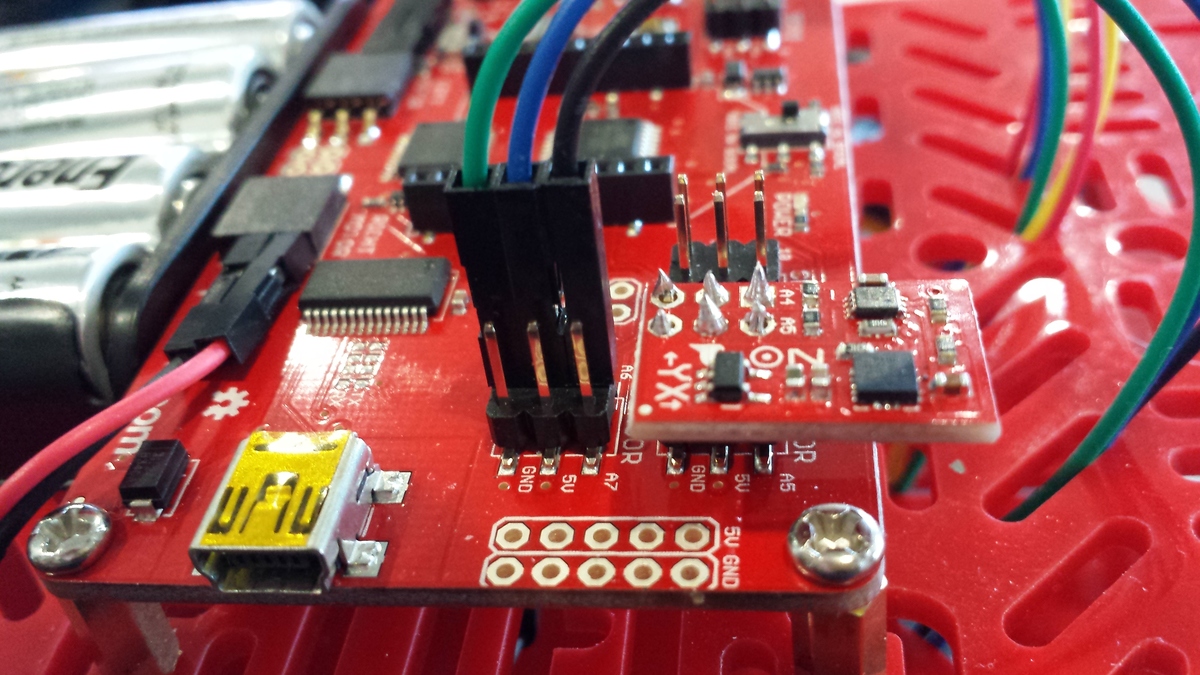
Each sensor has 3 wires, a power, ground, and line for controlling. The Line sensor on the left side goes to the Sensor row labeled A2 , the center one goes to A3, and the right hand one goes to A6. Here are a couple of photos showing mine
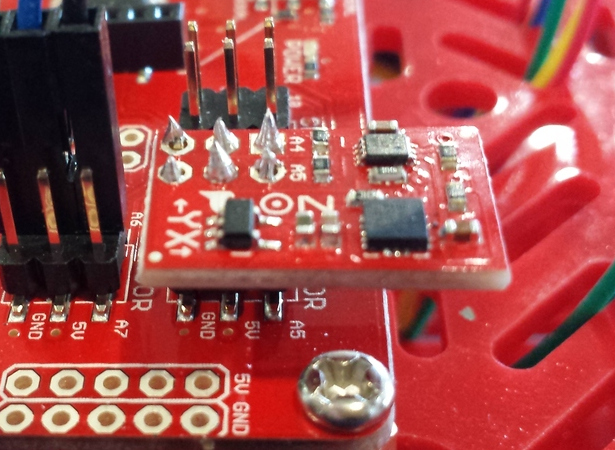
Left and Center Line Sensor (A2 A3)Right Line Sensor (A6)
I noticed that the sensors are on the BACK not the front of the robot, unsure if this is the correct way, but its how their images show it to be set up. I never actually used mine as yet, if i do it will probably be to stop it falling off a table.
3. Accelerometer mount
The accelerometer is the only thing needing to be soldered on, though you can always use headers if you wanted on this. The labels on the Accelerometer chip show what pins it goes on and where (A4 and A5) which helps show what way it goes up.
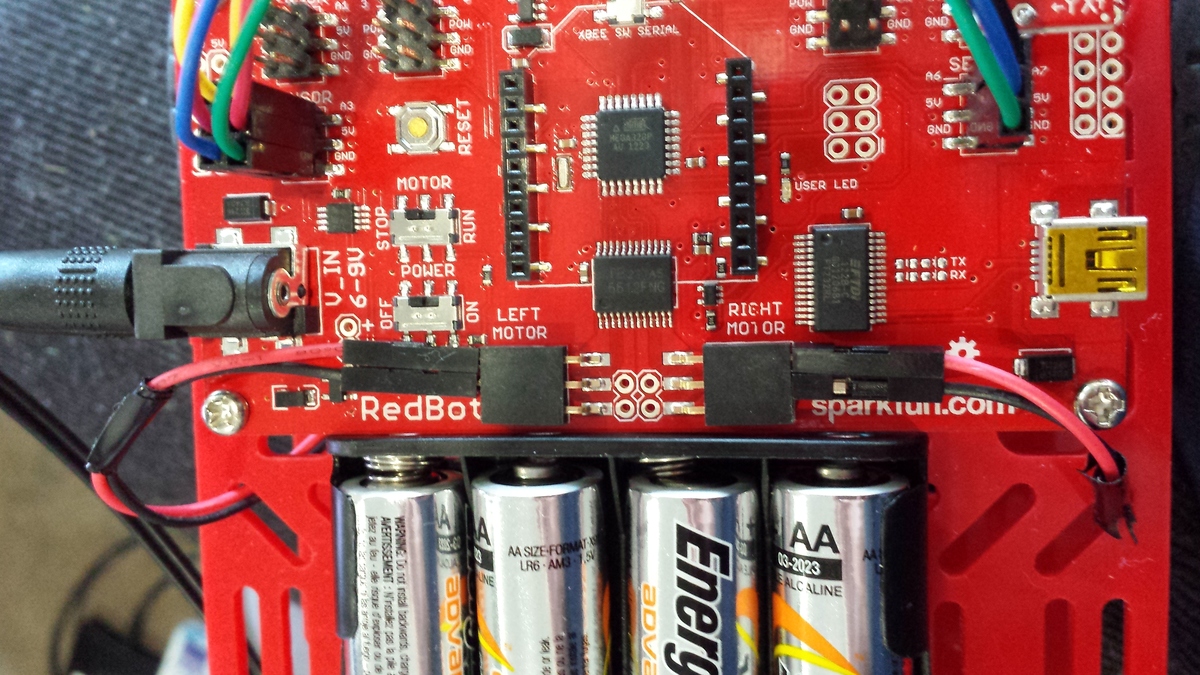
4. Motor connections
As for the motors, they are fairly self explanatory, 2 wires (red and black) go into the lines for the motors. the only thing to remember is that left goes on the left motor plugs, right on the right motor plugs.
Now you have the whole thing put together, it should work, however you have yet to program it! If you are super new, and unsure about the wiring for sensors, by all means feel free to leave them off (all line sensors and accelerometer are fine and not needed right away)
5. Arduino IDE
If you have not already installed the Arduino application, do so now. This allows you to use demo code, and upload or compile your own code for it. Don’t stress if you are unsure about programming, its mostly just a text file with instructions on what the robot needs to do.
The tutorial at the Quickstart is good, but it can be hard for a newbie to figure out installing libraries. First you need the files at http://dlnmh9ip6v2uc.cloudfront.net/datasheets/Robotics/RedBotLibrary.zip . Unzip these, and copy the RedBot folder into the libraries area for Arduino. For Linux this is in ~/sketchbook/libraries/ folder. For windows this is within the My Documents folder in a folder called libraries (if you get stuck see this ).
Now when you open Arduino application, you should be able to look through menus and see examples, and hopefully see RedBot examples. If you can see this, you got it right! If not, may pay to check where you went wrong . If you need help you can ask on the SparkFun Forums at https://forum.sparkfun.com/
6. Coding
Before you think about turning your new robot on, check the switches carefully. You will see there is a Power switch, as well as a Motor on/off switch.
Turn the motor switch to the ‘STOP’ position before you turn it on. This stops the car from driving off whilst you program it. Now you can find a cable to plug into the USB socket on the side (its a fairly generic one, if you don’t have one its easy to buy).
Once plugged in, and powered on, open the Arduino application. In the menus you can click Tools , then Board, and select the board type ‘Arduino mini W/ATMega 328’ . This sets the board type so the code compiles and uploads correctly. Now you are ready to code!
You can use the example code that comes with the RedBot libraries to start with, Its a bit confusing for a beginner to read, but it is a good way to test things are working ok usually. The default code waits for you to tap the accelerometer to start it following a line, so if it does not work right away,give it a tap with your finger.
I found most tutorials explanation of how they worked was easier to understand which allowed me to program it better to start off with. So here is a basic explanation.
Each motor has 3 pins assigned to it. One is set to either HIGH or LOW, and this one controls motion of the wheel. The next is set to HIGH or LOW and this controls the brake, setting it to LOW takes the brake off and allows the motor to be used. Lastly, the third controls the speed, and this number can be anywhere between 0-255, 255 being full speed.
7. Demo Code 1
With that in mind, this is how i did my first program
// setting motor pins as variables. This gives us a name rather than number which is easier to work with.
// Motor 1
int motorafb = 2; // Motor A on pin 2- forward/backwards
int motorab = 4; // Motor A on pin 4 - brake
int motorahs = 5; // Motor A on pin 5 - Speed
int motorbfb = 7; // Motor B on pin 7 - forward/backwards
int motorbb = 8; // Motor B on pin 8 - brake
int motorbhs = 6; // Motor B on pin 6 - Speed

void setup() {

  //Setup Motor A
  pinMode(motorafb, OUTPUT); //Initiates Motor  A pin
  pinMode(motorab, OUTPUT); //Initiates Brake  A pin

  //Setup Motor B
  pinMode(motorbfb, OUTPUT); //Initiates Motor B pin
  pinMode(motorbb, OUTPUT);  //Initiates Brake B pin
  }
void loop(){
// both motors full speed
  //Motor A
  digitalWrite(motorafb, HIGH); //Establishes forward direction of Motor A
  digitalWrite(motorab, LOW);   //Disengage the Brake for Motor A
  analogWrite(motorahs, 255);   //Spins the motor on Motor A at full speed

  //Motor B
  digitalWrite(motorbfb, HIGH);  //Establishes Forward direction of Motor B
  digitalWrite(motorbb, LOW);   //Disengage the Brake for Motor B
  analogWrite(motorbhs, 255);    //Spins the motor on Motor B at half speed

  // Wait 500ms (it will continue to drive during that 500ms)
  delay(500);

  // Turn by turning one motor forward, and one backward at half speed
  digitalWrite(motorafb, LOW);  //Establishes backward direction of Motor A
  digitalWrite(motorab, LOW);   //Disengage the Brake for Motor A
  analogWrite(motorahs, 155);    //Spins the motor on Motor A at half speed

  //Motor B forward @ full speed
  digitalWrite(motorbfb, HIGH); //Establishes forward direction of Motor B
  digitalWrite(motorbb, LOW);   //Disengage the Brake for Motor B
  analogWrite(motorbhs, 255);   //Spins the motor on Motor B at full speed

  // Another delay to let it turn fo 500ms
  delay(500);

 // STOP!
  digitalWrite(motorab, HIGH);  //Engage the Brake for Motor A
  digitalWrite(motorbb, HIGH);  //Engage the Brake for Motor B
  analogWrite(motorahs, 0); // Set speed to 0
  analogWrite(motorbhs, 0);// Set speed to 0
}
// setting motor pins as variables. This gives us a name rather than number which is easier to work with.
// Motor 1
int motorafb = 2; // Motor A on pin 2- forward/backwards
int motorab = 4; // Motor A on pin 4 - brake
int motorahs = 5; // Motor A on pin 5 - Speed
int motorbfb = 7; // Motor B on pin 7 - forward/backwards
int motorbb = 8; // Motor B on pin 8 - brake
int motorbhs = 6; // Motor B on pin 6 - Speed
void setup() {
//Setup Motor A
pinMode(motorafb, OUTPUT); //Initiates Motor A pin
pinMode(motorab, OUTPUT); //Initiates Brake A pin
//Setup Motor B
pinMode(motorbfb, OUTPUT); //Initiates Motor B pin
pinMode(motorbb, OUTPUT); //Initiates Brake B pin
}
void loop(){
// both motors full speed
//Motor A
digitalWrite(motorafb, HIGH); //Establishes forward direction of Motor A
digitalWrite(motorab, LOW); //Disengage the Brake for Motor A
analogWrite(motorahs, 255); //Spins the motor on Motor A at full speed
//Motor B
digitalWrite(motorbfb, HIGH); //Establishes Forward direction of Motor B
digitalWrite(motorbb, LOW); //Disengage the Brake for Motor B
analogWrite(motorbhs, 255); //Spins the motor on Motor B at half speed
// Wait 500ms (it will continue to drive during that 500ms)
delay(500);
// Turn by turning one motor forward, and one backward at half speed
digitalWrite(motorafb, LOW); //Establishes backward direction of Motor A
digitalWrite(motorab, LOW); //Disengage the Brake for Motor A
analogWrite(motorahs, 155); //Spins the motor on Motor A at half speed
//Motor B forward @ full speed
digitalWrite(motorbfb, HIGH); //Establishes forward direction of Motor B
digitalWrite(motorbb, LOW); //Disengage the Brake for Motor B
analogWrite(motorbhs, 255); //Spins the motor on Motor B at full speed
// Another delay to let it turn fo 500ms
delay(500);
// STOP!
digitalWrite(motorab, HIGH); //Engage the Brake for Motor A
digitalWrite(motorbb, HIGH); //Engage the Brake for Motor B
analogWrite(motorahs, 0); // Set speed to 0
analogWrite(motorbhs, 0);// Set speed to 0
}
This sketch will loop, essentially making your robot drive in circles nicely. Paste the entire thing into your arduino IDE, make sure the robot is plugged in and switched on, then push the -> or compile/upload button to upload it. Sometimes after plugging in, it takes a few seconds to link too your PC, if it errors, give it a few seconds before trying again. Once uploaded, you can unplug your robot, and switch the motor back on to test.
Test yourself, see if you can make it run in a square using all those above commands!
From here you should be able to play around with it a bit, and then add in sensors to the code.
8. Demo Code 2
Here is an example of code with the accel sensor working, so if the bot feels an impact, it reverses and then turns
// We are using the RedBot library for the accelerometer code
#include <RedBot.h>
RedBotAccel xl;

// setting motor pins as variables
int motorafb = 2;
int motorab = 4;
int motorahs = 5;
int motorbfb = 7;
int motorbb = 8;
int motorbhs = 6;

void setup() {

  //Setup Motor Channel A
  pinMode(motorafb, OUTPUT); //Initiates  pin
  pinMode(motorab, OUTPUT); //Initiates Brake Motor Channel A pin

  //Setup Motor Channel B
  pinMode(motorbfb, OUTPUT); //Initiates  pin
  pinMode(motorbb, OUTPUT);  //Initiates Brake Motor Channel A pin

// This is the bit to enable the accelerometer using the RedBot library
  xl.enableBump();
  xl.setBumpThresh(70);
}

void loop(){
// this if statement checks to see if its been bumped, and if it has, it runs the commands inside the {}
 if (xl.checkBump()) {

  digitalWrite(motorab, HIGH);  //Engage the Brake for Motor Channel A
  digitalWrite(motorbb, HIGH);  //Engage the Brake for Motor Channel B
  delay(500);
   //Motor A reversing @ full speed
  digitalWrite(motorafb, LOW);  //Establishes backward direction of Motor Channel A
  digitalWrite(motorab, LOW);   //Disengage the Brake for Motor Channel A
  analogWrite(motorahs, 255);    //Spins the motor on Motor Channel A at half speed

  //Motor B reversing @ full speed
  digitalWrite(motorbfb, LOW); //Establishes forward direction of Motor Channel B
  digitalWrite(motorbb, LOW);   //Disengage the Brake for Motor Channel B
  analogWrite(motorbhs, 255);   //Spins the motor on Motor Channel B at full speed

  delay(1000);

   //Motor A reversing @ half speed
  digitalWrite(motorafb, LOW);  //Establishes backward direction of Motor Channel A
  digitalWrite(motorab, LOW);   //Disengage the Brake for Motor Channel A
  analogWrite(motorahs, 155);    //Spins the motor on Motor Channel A at half speed

  //Motor B forward @ full speed
  digitalWrite(motorbfb, HIGH); //Establishes forward direction of Motor Channel B
  digitalWrite(motorbb, LOW);   //Disengage the Brake for Motor Channel B
  analogWrite(motorbhs, 255);   //Spins the motor on Motor Channel B at full speed

  delay(500);

 } else // This is what happens if nothing has been bumped into
 {
  // both motors full speed
  //Motor A forward @ full speed
  digitalWrite(motorafb, HIGH); //Establishes forward direction of Motor Channel A
  digitalWrite(motorab, LOW);   //Disengage the Brake for Motor Channel A
  analogWrite(motorahs, 255);   //Spins the motor on Motor Channel A at full speed

  //Motor B foward @ full speed
  digitalWrite(motorbfb, HIGH);  //Establishes backward direction of Motor Channel B
  digitalWrite(motorbb, LOW);   //Disengage the Brake for Motor Channel B
  analogWrite(motorbhs, 255);    //Spins the motor on Motor Channel B at half speed

  //delay(1000);
// STOP!

  digitalWrite(motorab, HIGH);  //Engage the Brake for Motor Channel A
  digitalWrite(motorbb, HIGH);  //Engage the Brake for Motor Channel B
  analogWrite(motorahs, 0); // Set speed to 0
  analogWrite(motorbhs, 0);// Set speed to 0

  delay(500);

  //Turn right
  //Motor A forward @ full speed revering
  digitalWrite(motorafb, LOW);  //Establishes backward direction of Motor Channel A
  digitalWrite(motorab, LOW);   //Disengage the Brake for Motor Channel A
  analogWrite(motorahs, 155);    //Spins the motor on Motor Channel A at half speed

  //Motor B forward @ full speed
  digitalWrite(motorbfb, HIGH); //Establishes forward direction of Motor Channel B
  digitalWrite(motorbb, LOW);   //Disengage the Brake for Motor Channel B
  analogWrite(motorbhs, 255);   //Spins the motor on Motor Channel B at full speed

  delay(255);

  digitalWrite(motorab, HIGH);  //Engage the Brake for Motor Channel A
  digitalWrite(motorbb, HIGH);  //Engage the Brake for Motor Channel B

  delay(3000);
 }
}
// We are using the RedBot library for the accelerometer code
#include <RedBot.h>
RedBotAccel xl;
// setting motor pins as variables
int motorafb = 2;
int motorab = 4;
int motorahs = 5;
int motorbfb = 7;
int motorbb = 8;
int motorbhs = 6;
void setup() {
//Setup Motor Channel A
pinMode(motorafb, OUTPUT); //Initiates pin
pinMode(motorab, OUTPUT); //Initiates Brake Motor Channel A pin
//Setup Motor Channel B
pinMode(motorbfb, OUTPUT); //Initiates pin
pinMode(motorbb, OUTPUT); //Initiates Brake Motor Channel A pin
// This is the bit to enable the accelerometer using the RedBot library
xl.enableBump();
xl.setBumpThresh(70);
}
void loop(){
// this if statement checks to see if its been bumped, and if it has, it runs the commands inside the {}
if (xl.checkBump()) {
digitalWrite(motorab, HIGH); //Engage the Brake for Motor Channel A
digitalWrite(motorbb, HIGH); //Engage the Brake for Motor Channel B
delay(500);
//Motor A reversing @ full speed
digitalWrite(motorafb, LOW); //Establishes backward direction of Motor Channel A
digitalWrite(motorab, LOW); //Disengage the Brake for Motor Channel A
analogWrite(motorahs, 255); //Spins the motor on Motor Channel A at half speed
//Motor B reversing @ full speed
digitalWrite(motorbfb, LOW); //Establishes forward direction of Motor Channel B
digitalWrite(motorbb, LOW); //Disengage the Brake for Motor Channel B
analogWrite(motorbhs, 255); //Spins the motor on Motor Channel B at full speed
delay(1000);
//Motor A reversing @ half speed
digitalWrite(motorafb, LOW); //Establishes backward direction of Motor Channel A
digitalWrite(motorab, LOW); //Disengage the Brake for Motor Channel A
analogWrite(motorahs, 155); //Spins the motor on Motor Channel A at half speed
//Motor B forward @ full speed
digitalWrite(motorbfb, HIGH); //Establishes forward direction of Motor Channel B
digitalWrite(motorbb, LOW); //Disengage the Brake for Motor Channel B
analogWrite(motorbhs, 255); //Spins the motor on Motor Channel B at full speed
delay(500);
} else // This is what happens if nothing has been bumped into
{
// both motors full speed
//Motor A forward @ full speed
digitalWrite(motorafb, HIGH); //Establishes forward direction of Motor Channel A
digitalWrite(motorab, LOW); //Disengage the Brake for Motor Channel A
analogWrite(motorahs, 255); //Spins the motor on Motor Channel A at full speed
//Motor B foward @ full speed
digitalWrite(motorbfb, HIGH); //Establishes backward direction of Motor Channel B
digitalWrite(motorbb, LOW); //Disengage the Brake for Motor Channel B
analogWrite(motorbhs, 255); //Spins the motor on Motor Channel B at half speed
//delay(1000);
// STOP!
digitalWrite(motorab, HIGH); //Engage the Brake for Motor Channel A
digitalWrite(motorbb, HIGH); //Engage the Brake for Motor Channel B
analogWrite(motorahs, 0); // Set speed to 0
analogWrite(motorbhs, 0);// Set speed to 0
delay(500);
//Turn right
//Motor A forward @ full speed revering
digitalWrite(motorafb, LOW); //Establishes backward direction of Motor Channel A
digitalWrite(motorab, LOW); //Disengage the Brake for Motor Channel A
analogWrite(motorahs, 155); //Spins the motor on Motor Channel A at half speed
//Motor B forward @ full speed
digitalWrite(motorbfb, HIGH); //Establishes forward direction of Motor Channel B
digitalWrite(motorbb, LOW); //Disengage the Brake for Motor Channel B
analogWrite(motorbhs, 255); //Spins the motor on Motor Channel B at full speed
delay(255);
digitalWrite(motorab, HIGH); //Engage the Brake for Motor Channel A
digitalWrite(motorbb, HIGH); //Engage the Brake for Motor Channel B
delay(3000);
}
}
8. Demo Code 3
This is a demonstration on how a function works, to save you typing the same code all the time. This example is the same as the Demo 1, only it uses a function, thus saving us a lot of copy/paste code later on.
// setting motor pins as variables
// Motor 1
int motorafb = 2; // Motor A - forward/backwards
int motorab = 4; // Motor A - brake
int motorahs = 5; // Motor A - Speed
int motorbfb = 7; // Motor B - forward/backwards
int motorbb = 8; // Motor B - brake
int motorbhs = 6; // Motor B - Speed

void setup() {

//Setup Motor A
pinMode(motorafb, OUTPUT); //Initiates Motor A pin
pinMode(motorab, OUTPUT); //Initiates Brake A pin

//Setup Motor B
pinMode(motorbfb, OUTPUT); //Initiates Motor B pin
pinMode(motorbb, OUTPUT); //Initiates Brake B pin
}

// two functions which turn one motor on, the other off for 'spd' speed, and 'tme' Time

void TurnRight(int spd, int tme){
digitalWrite(motorafb, LOW);
digitalWrite(motorab, LOW);
analogWrite(motorahs, spd);

digitalWrite(motorbfb, 'HIGH');
digitalWrite(motorbb, LOW);
analogWrite(motorbhs, spd);
delay(tme);
}

void TurnLeft(int spd, int tme){
digitalWrite(motorafb, HIGH);
digitalWrite(motorab, LOW);
analogWrite(motorahs, spd);

digitalWrite(motorbfb, LOW);
digitalWrite(motorbb, LOW);
analogWrite(motorbhs, spd);
delay(tme);
}

// Function to go power both motors for 'spd' speed, and 'tme' time
void GoForward(int spd, int tme){
digitalWrite(motorafb, HIGH);
digitalWrite(motorab, LOW);
analogWrite(motorahs, spd);

digitalWrite(motorbfb, HIGH);
digitalWrite(motorbb, LOW);
analogWrite(motorbhs, spd);
delay(tme);
}

// Function to stop for a set amount of time - tme
void Stop(int tme){
digitalWrite(motorab, HIGH);
digitalWrite(motorbb, HIGH);
analogWrite(motorahs, 0);
analogWrite(motorbhs, 0);
delay(tme);
}

void loop(){
// Now we can use them like this

GoForward(255, 500); // So this will go forward full speed (255) fpr 500ms
Stop(1000); // Sits Stopped for 1000ms
TurnRight(255, 1000); // turns Right at full speed for 1000ms
Stop(1000);// Sits Stopped for 1000ms
TurnLeft(255, 1000); // turns Left at full speed for 1000ms
Stop(1000); // Sits Stopped for 1000ms

}
// setting motor pins as variables
// Motor 1
int motorafb = 2; // Motor A - forward/backwards
int motorab = 4; // Motor A - brake
int motorahs = 5; // Motor A - Speed
int motorbfb = 7; // Motor B - forward/backwards
int motorbb = 8; // Motor B - brake
int motorbhs = 6; // Motor B - Speed
void setup() {
//Setup Motor A
pinMode(motorafb, OUTPUT); //Initiates Motor A pin
pinMode(motorab, OUTPUT); //Initiates Brake A pin
//Setup Motor B
pinMode(motorbfb, OUTPUT); //Initiates Motor B pin
pinMode(motorbb, OUTPUT); //Initiates Brake B pin
}
// two functions which turn one motor on, the other off for 'spd' speed, and 'tme' Time
void TurnRight(int spd, int tme){
digitalWrite(motorafb, LOW);
digitalWrite(motorab, LOW);
analogWrite(motorahs, spd);
digitalWrite(motorbfb, 'HIGH');
digitalWrite(motorbb, LOW);
analogWrite(motorbhs, spd);
delay(tme);
}
void TurnLeft(int spd, int tme){
digitalWrite(motorafb, HIGH);
digitalWrite(motorab, LOW);
analogWrite(motorahs, spd);
digitalWrite(motorbfb, LOW);
digitalWrite(motorbb, LOW);
analogWrite(motorbhs, spd);
delay(tme);
}
// Function to go power both motors for 'spd' speed, and 'tme' time
void GoForward(int spd, int tme){
digitalWrite(motorafb, HIGH);
digitalWrite(motorab, LOW);
analogWrite(motorahs, spd);
digitalWrite(motorbfb, HIGH);
digitalWrite(motorbb, LOW);
analogWrite(motorbhs, spd);
delay(tme);
}
// Function to stop for a set amount of time - tme
void Stop(int tme){
digitalWrite(motorab, HIGH);
digitalWrite(motorbb, HIGH);
analogWrite(motorahs, 0);
analogWrite(motorbhs, 0);
delay(tme);
}
void loop(){
// Now we can use them like this
GoForward(255, 500); // So this will go forward full speed (255) fpr 500ms
Stop(1000); // Sits Stopped for 1000ms
TurnRight(255, 1000); // turns Right at full speed for 1000ms
Stop(1000);// Sits Stopped for 1000ms
TurnLeft(255, 1000); // turns Left at full speed for 1000ms
Stop(1000); // Sits Stopped for 1000ms
}


 Technically this iPod is not supported, and i did a ton of hunting aound on google before i found the following post